


 As some of you requested, I cameup with this small update on how to replace ODD with a HDD on Lenovo Z500.
The actual job is really easy as you will use a SATA HDD Caddy in order to perform the action. I have ordered mine from Amazon for 11.99 Euro including the transport
I will not enter into too many details on how to remove the ODD as in my previous post Lenovo Z500 SSD upgrade where I have removed the HDD, I already covered that part. I will only point the fact that what you need to remove the first 2 screws that hold in place the keyboard.

Remove the keyboard, in order to have access to the screw that holds the ODD.

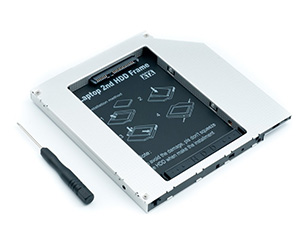
Now you can safely remove the ODD and install the SATA HDD Caddy instead.
As you can see in the picture below it is really easy and well explained how you install the HDD into the caddy. Don’t forget to tighten the screw that holds the HDD.

Once you finished that, go to the BOOT Menu and make sure that the order of the booting devices has not changed. Save the settings and you’re done. You now have a second HDD on your Lenovo Z500.
lapita rai
June 16, 2015 #1 AuthorHi thx for this excellent post..
Can a ssd be installed instead of a hdd in the odd slot? Will it affect performance?
Regards..
Alex
June 16, 2015 #2 AuthorYou can install also an SDD in the ODD slot. It will affect the overall speed of the system. It is advisable to have an HDD though, as you will have a lot more storage available for your money.
deepak
July 10, 2015 #3 Authoralex ,i don’t know how to put this properly,but after replacing the odd with caddy doesn’t the laptop look weird ,odd drive has a curve to it which makes it flush with the body but the caddy is a rectangular block with no curve ,isn’t there a gap after installing it or did you buy a backplate for the caddy too?
Alex
July 10, 2015 #4 AuthorYes you are right, I wanted to buy a cover for it but I postponed it for no reason at all. It looks weird for now but I will add the cover asap.
Anthony
September 12, 2015 #5 Authorwill the 12.7mm bay caddy work? Everywhere I’ve read mentions a 9.5mm caddy
Alex
September 15, 2015 #6 AuthorI do not think that the 12,7 mm bay caddy will work. The 9.5mm is an exact fit.
Anton
October 1, 2015 #7 AuthorHello,
I want to know, is this case working on SATA II or SATA III?
And what data transfer speed max on it ?
Alex
October 9, 2015 #8 AuthorSorry for my late answer, for some reason I did not get the notification. My second HDD is SATA III according to manufacturer. When I scan the computer with appropriate programs it gives me SATA II for this specific HDD.
Michelasso
December 8, 2015 #9 AuthorHello,
I followed both of your two tutorials on how to replace the hard disk of the Ideapad z500 with a ssd, and this one, I thank you a lot for them, I have just one question: the caddy for the hard disk doesn’ have a hole to fix them with a screw as it was for the ODD, do you think this could be a problem?
Alex
December 10, 2015 #10 AuthorHello,
It depends of what you are doing with the laptop, but yes it could be a problem. Due to some shocks the caddy could come out from its socket and that-s never good. My caddy for example had the same fixing support as the ODD.
Michelasso
December 10, 2015 #11 AuthorMaybe I am wrong, but I think I have bought the same as yours…but maybe I have
missed one point: there is a tiny piece of metal attached to the odd with two screws
that provides a hole that is then used to fix it to the motherboard with the screw marked with an arrow in your picture above. I will check if I can remove this piece of metal and fix it to the caddy.
Alex
December 10, 2015 #12 AuthorI don’t remember exactly, but I think that I did the same thing.
Michelasso
December 10, 2015 #13 AuthorThanks again, it worked.
Michelasso
December 18, 2015 #14 AuthorOne last (and late) question: did you perhaps buy an enclosure to use the ODD as an external one?
Jessica
October 16, 2018 #15 AuthorHello, I saw your tutorial and I find it very clear and easy to follow, thnak you very much! I just have some questions: Will any caddy with 9,5mm fit in this laptop? The one, that you bought, what are the dimensions of it? Some people found that the caddy was a little short. Did you try to replace the cover of the ODD and put it in your caddy?